|
- After turning in Give it a Name from New Agamand,
Howling Fjord, you will get the follow-up To Venomspite!
and be flown off to Venomspite, Dragonblight. Get
the Flight Path. Set your Hearthstone
to Venomspite.
Turn in To Venomspite! and get all the quests here:
- Blighted Last Rites
- Funding the War Effort
- Materiel Plunder
- The Forsaken Blight and You: How Not to Die
- Wanted: The Scarlet Onslaught
- To Conquest Hold, But Be Careful!
Use the Blight on the Scarlet Onslaught Prisoner
and turn in Blighted Last Rites. Get the follow-up
Let Them Not Rise!
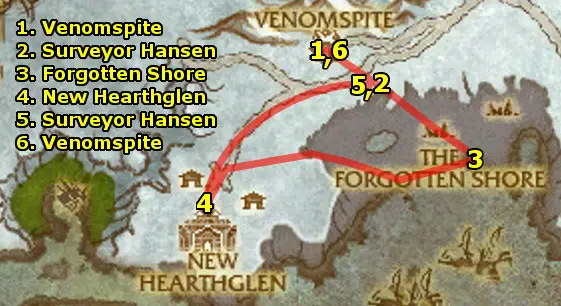
- Ride southeast to Surveyor Hansen. Get Beachfront
Property.
- Head down to The Forgotten Shore. Clear your way towards
the shipwrecks and collect the treasure first, then start clearing
your way west to the next area once you've collected the treasure.
In all:
- Kill 20 Forgotten Ghosts
- Loot 10 Ectoplasmic Residue
- Collect 6 Forgotten Treasure
- Ride west to New Hearthglen. In the area:
- Kill 20 Members of the Scarlet Onslaught
- Use the Container of Rats on 15 Scarlet Onslaught
Corpses
- Collect 8 Scarlet Onslaught Armor and 8 Scarlet
Onslaught Weapon
- Ride east back to Surveyor Hansen and turn in Beachfront
Property.
- Return to Venomspite.
- At Venomspite, turn in all your quests:
- Funding the War Effort
- Let Them Not Rise!
- Materiel Plunder
- The Forsaken Blight and You: How Not to Die
- Wanted: The Scarlet Onslaught
Get the new quests:
- Emerald Dragon Tears
- Fresh Remounts
- No Mercy for the Captured
- Stealing from the Siegesmiths
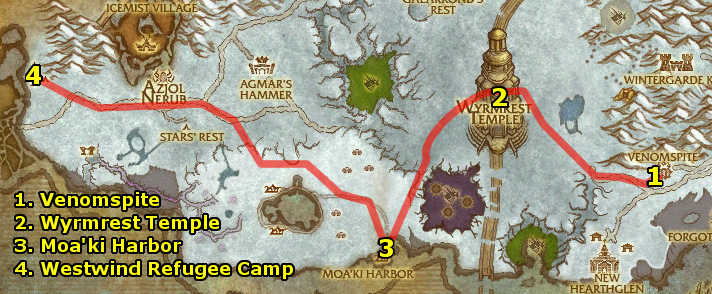
Time to travel across the map and pick up all the flight ponts
along the way.
- Ride to Wyrmrest Temple. Get the Flight Path.
Its at the northern side of the temple.
- Ride southwest to Moa'ki Harbor. Get the Flight Path.
- Ride northwest to the Westwind Refugee Camp.
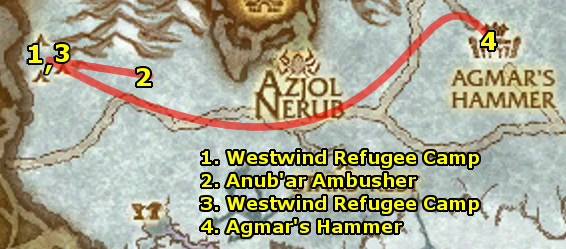
- At the Westwind Refugee Camp, get the two quests Into
the Fold and Pride of the Horde.
- Head east. Kill 15 Anub'ar Ambusher and gather 10
Horde Armaments.
- Return to the Westwind Refugee Camp. Turn in your quests:
- Into the Fold and get the follow-up Blood Oath
of the Horde
- Pride of the Horde
Talk to 5 Taunka'le Refugees in the camp and read them
the Blood Oath of the Horde.
Once done, turn in Blood Oath of the Horde and get the
follow-up Agmar's Hammer.
- Ride east to Agmar's Hammer. Get the Flight Path.
Turn in Agmar's Hammer and get Victory Nears... and
Rifle the Bodies in the same building.
Turn in Victory Nears... and get all the quests in town:
- From the Depths of Azjol-Nerub
- Message From the West
- Black Blood of Yogg-Saron
- Containing the Rot
- From the Depths of Azjol-Nerub
- Marked for Death: High Cultist Zangus
- Wanted: Dreadtalon (Group)
- Wanted: Gigantaur (Group)
- Wanted: Magister Keldonus (Group)
Complete Message from the West by reading the Letter
from Sarufang, then burning it with the Burning Brazier
near Messenger Torvus.
The following steps are all Optional and should only
be done with a group of at least two (if you have a healer and/or
tank) or can be done with more to complete with ease. Feel free
to skip these steps completely, or come back to this at ANY time.
The experience rate if you can find a group for these three steps
is well worth it - just continue along with the guide and keep your
eyes peeled for any groups forming to do the Wanted quests.
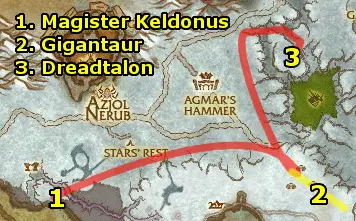
- (Group) Ride southwest out of Agmar's Hammer to
Magister Keldonus at the cliff. Kill him.
- (Group) Ride east to Gigantaur, who wanders the
woods southeast of Agmar's Hammer. Kill him.
- (Group) Ride north to Dreadtalon who is on the
plateau above its nest. Kill it.
You'll often find people willing to form groups for "The Wanted
quests" in the zone, which refer to these three. Keep looking
for a group throughout your time in the zone so you can complete
these easy quests which give a lot of experience.
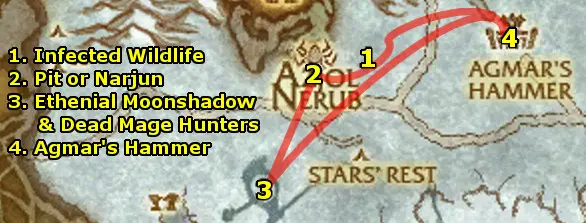
- Ride west out of Agmar's Hammer to an area with many
Rabid Grizzlies and Blighted Elks. Kill 15 Infected
Wildlife and make sure you loot the random drop Rot Resistant
Organ as well.
- Clear your way into the Pit of Narjun. At the entrance
is a hole - jump into it immediately. You will come face to face
with Kilix the Unraveler. This will give you credit for
Pit of Narjun Explored. Get his quests:
- An Enemy in Arthas
- Death to the Traitor King (Azjol-Nerub)
- Don't Forget the Eggs! (Azjol-Nerub)
- The Faceless Ones (The Old Kingdom)
Head east and kill High Cultist Zangus for the Head
of High Cultist Zangus. Also, kill 6 Abu'ar Underlords.
Once you've killed 6, return to Kilix and turn in An
Enemy in Arthas. Get the follow-up The Lost Empire.
Clear your way through the tunnels, picking up 10 Black Blood
of Yogg-Saron on your way out. Get out of the tunnels by
going up the tunnel which slopes upwards and outside.
- Ride southwest to Ethenial Moonshadow. Get Avenge
this Atrocity!
Loot all the Dead Mage Hunters (corpses already on the
ground) for their Mage Hunter's Personal Effects. Keep
opening them until you find the Moonrest Garden Plans.
- Return to Agmar's Hammer.

- At Agmar's Hammer, turn in all your quests:
- Black Blood of Yogg-Saron and get the follow-up Scourge
Armaments
- Containing the Rot and get the follow-up The Good
Doctor...
- The Good Doctor... and get the follow-up In Search
of the Ruby Lilac
- From the Depths of Azjol-Nerub and get the follow-up
The Might of the Horde
- Marked for Death: High Cultist Zangus
- Rifle the Bodies and get the follow-up Prevent
the Accord
- The Lost Empire
Also, get the new quest Strength of Icemist.
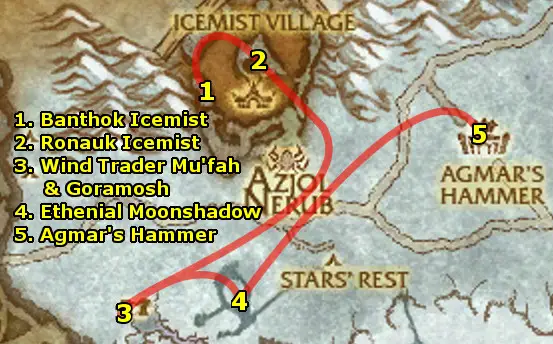
- Ride west into Icemist Village. Head up the ramp and
jump into the upper level stream and clear your way along it to
Banthok Icemist. Get Strength of Icemist and get
the follow-up Chains of the Anub'ar.
- Head along the stream and on the north side of the stream you'll
see a hut. Kill Anok'ra the Manipulator inside the hut
for Anok'ra's Key Fragment.
- Head up into the village. In the main huts on the southern side
of the village, you'll find Sinok the Shadowrager. Kill
it for Sinok's Key Fragment.
- Clear your way to the north side of the village and find Tivax
the Breaker (he spawns in either the northwest hut or the
northeast hut). Kill it for Tivax's Key Fragment.
- Clear your way back to Banthok Icemist, this time by
heading down the path on the northwestern side of the village.
- At Banthok Icemist, turn in Chains of the Anub'ar.
Get the follow-up Return of the High Chief.
- Head northeast back up the path and go to Roanauk Icemist
in the middle of the village. Unlock the Anub'ar Prison
Mechanism to free him, then kill the attackers. Loot the Fragment
of Anub'et'khan's Husk.
Also, use the Warsong Battle Standard in the village and
defend it from all the attackers. Make sure to pull the attackers
off the standard quickly since the standard has a low amount of
health.
Through all the killing, hopefully you have looted the random
drop item Flesh-Bound Tome for the quest The Flesh-Bound
Tome. If you haven't, keep killing the cultists until you
get it. Finish looting 8 Scourge Armaments from the cultists
as well.
- Ride southwest to and kill 15 Blue Dragonflight Forces.
Clear your way to the front of the building and kill Wind Trader
Mu'fah for Wind Trader Mu'fah's Remains.
Head inside the building and go up the ramp to the left. Kill
Goramosh for The Scales of Goramosh and Goramosh's
Strange Device, which starts the quest A Strange Device.
- Return to Ethenial Moonshadow and turn in Avenge this
Atrocity! and get the follow-up End Arcanimus.
- Ride northeast to Agmar's Hammer.

- At Agmar's Hammer, turn in all your quests:
- A Strange Device and get the follow-up Projections
and Plans
- Scourge Armaments
- The Flesh-Bound Tome and get the follow-up Koltira
and the Language of Death
- The Might of the Horde and get the follow-up Attack
by Air!
- Attack by Air! and get the follow-up Blightbeasts
be Damned!
- Prevent the Accord
- Return of the High Chief and get the follow-up All
Hail Roanauk!
Follow Overlord Agmar to Roanauk. Read Roanauk
the Blood Oath of the Horde. Once Roanauk has become
a full-fledged member of the Horde, turn in All Hail Roanauk!
Turn in Koltira and the Language of Death to the
Death Knight Koltira in town and get the follow-ups:
- In Service of Blood
- In Service of Frost
- In Service of Unholy
- Ride west to Icemist Village. Use Valnok's Flare Gun
to mount the Kor'kron War Rider. You'll have three
abilities:
- Ability 1: Blightbeast Bane - This ability
used to be a machine-gun, but a recent patch has nerfed it
to the point of unusability. Don't use this weak ability.
- Ability 2: Big Blue - This is a powerful frontal
AoE attack. Gather a lot of bats, face them, and use this
ability to kill many.
- Ability 3: Field Medi-Pack - This heals your
war rider to full.
The Anub'ar Blightbeasts use an ability called Blighted
Shriek - keep moving to dodge these attacks. Kill 25
Anub'ar Blightbeasts.
- Fly southwest as far as you can, then ride southwest. Head down
the path to Arcanimus and kill it.
- Use the Surge Needle Teleporter to teleport you onto
a platform. Walk to the center of the platform to get credit for
Object on the Surge Needle Observed. Then, use the Surge
Needle Teleporter again.
- Ride southeast to Ethenial Moonshadow and turn in End
Arcanimus.
- Return to Agmar's Hammer.
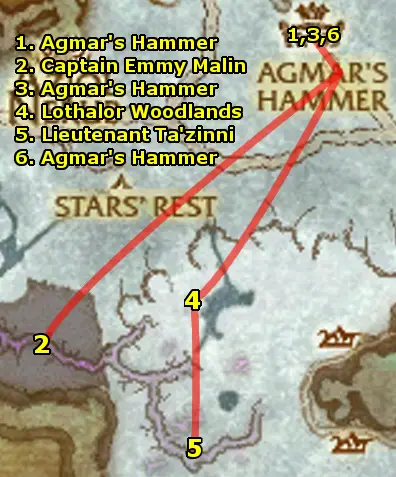
- At Agmar's Hammer, turn in your quests:
- Blightbeasts be Damned!
- Projections and Plans and get the follow-up The
Focus on the Beach
- Ride southwest to Captain Emmy Malin. Kill her and loot
the Ley Line Focus Control Ring, which you then need to
use while standing next to the Ley Line Focus.
- Return to Agmar's Hammer and turn in The Focus on
the Beach. Get the follow-ups Atop the Woodlands and
Strengthen the Ancients.
- Ride southwest into the Lothalor Woodlands. Look for
Woodlands Walker and ask them for their bark. Get three
of the bark and use them on the uncorrupted Lothalor Ancients.
- Go south and kill Lieutenant Ta'zinni for the Ley
Line Focus Control Amulet and Lieutenant Ta'zinni's Letter.
The letter starts the quest A Letter for Home.
Use the Ley Line Focus Control Amulet next to the Ley
Line Focus.
- Return to Agmar's Hammer and turn in your quests:
- A Letter for Home
- Atop the Woodlands and get the follow-up Search
Indu'le Village
- Strengthen the Ancients
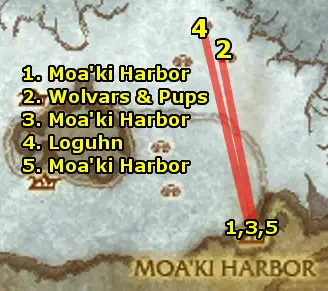
- Fly to Moa'ki Harbor. Get the quests Let Nothing Go
to Waste and Planning for the Future.
- Head north and kill the Wolvars for 6 Stolen Moa'ki
Goods and and collect 12 Snowfall Glade Pups in the
village.
- Return to Moa'ki Harbor and turn in:
- Let Nothing Go To Waste and get the follow-up Slay
Loguhn
- Planning for the Future
- Head to the northern hut of the village and kill Loguhn
for the Blood of Loguhn. Use the blood.
- Return to Moa'ki Harbor.
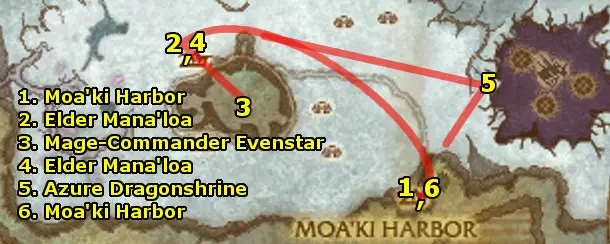
- At Moa'ki Harbor, turn in Slay Loguhn. Get the
follow-up, Spiritual Insight.
- Use Toalu'u's Spiritual Incense to enter into an
automated flight. When returned, turn in Spiritual Insight
and get the follow-up Elder Mana'loa.
- Follow the road northwest to Elder Mana'loa and turn
in Elder Mana'loa and get the follow-up Freedom for
the Lingering.
- Dive into the lake and swim to the corpse of Mage-Commander
Evenstar.
- Turn in Search Indu'le Village and get the follow-up
The End of the Line.
- Use the Ley Line Focus Control Talisman next to the
Ley Line Focus.
- Kill 15 Indu'le Fisherman, Warriors, or Mystics nearby.
- Weaken a Deranged Indu'le Villager and use the Blood
Gem on him.
- Return to Elder Mana'loa and turn in Freedom for the
Lingering and get the follow-up Conversing With the Depths.
- Ride east to the western ledge of Azure Dragonshrine to
get credit for Azure Dragonshrine Observed.
- Return to Moa'ki Harbor. Go to the coast and get Tua'kea's
Crab Traps.

- Dive down south and get the quest Signs of Big Watery Trouble
from the Wrecked Crab Trap. Also, collect 8 Tua'kea
Crab Traps around the area.
- Return to Moa'ki Harbor and turn in:
- Tua'kea's Crab Traps
- Signs of Big Watery Trouble and get the follow-up
The Bait.
- Swim southwest and kill Kili'ua for The Flesh of "Two
Huge Pincers".
- Swim west to the island and head all the way up to The Pearl
of the Depth. Use it to summon Oacha'noa. Jump into
the water when she tells you to.
- Swim back to Moa'ki Harbor and turn in The Bait and
get the follow-up Meat on the Hook.
- Follow the giant fishing line out and dive and use Tu'u'gwar's
Bait next to Tua'kea's Fishing Hook and kill Tu'u'gwar.
- Return to Moa'ki Harbor and turn in:
- Meat on the Hook
- Conversing With the Depths
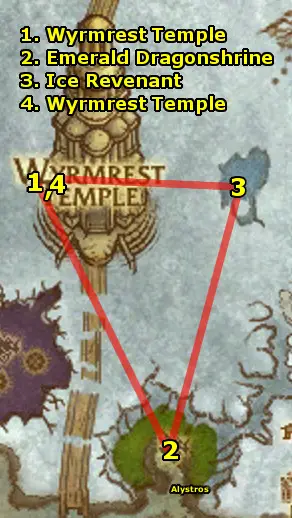
- Fly to Wyrmrest Temple. On the west side of the temple,
talk to Tariolstrasz and turn in Gaining an Audience.
Get the follow-up Speak with your Ambassador. Talk to him
again and ask him to have a drake fly you to the top of the temple.
At the top, get the quests:
- Seeds of the Lashers
- The Obsidian Dragonshrine
- Mystery of the Infinite
Then, go back and ask to be flown back to ground level.
- At the southwest side of the temple outside, go to Golluck
Rockfist and turn in Speak with your Ambassador.
Get the follow-up Report to the Ruby Dragonshrine.
- Ride south to the Emerald Dragonshrine to Nishera
the Garden Keeper who wanders around the lake. Get Cycle
of Life.
- At the glade, kill Emerald Lashers for 3 Lasher
Seeds, and look in the sky above the lake and pull and
kill 5 Emerald Skytalons. Also, collect 8 Emerald
Dragon Tears.
- Return to Nishera and turn in Cycle of Life and
get the follow-up Plume of Alystros (Group).
(Group) If there's anyone around in the grove, ask
if they want to team up for Plume of Alystros. If not,
ask in chat. If you don't find anybody readily available,
skip this step for now and get back to it later.
- Get a group with at least a tank and healer, and head
to the southeast area of the glade and use the Skytalon
Molts to pull Alystsros. Kill him and loot
his Plume of Alystros.
- Return to Nishera and turn in The Plume of
Alystros.
- Ride northeast to the frozen lake. Weaken an Ice Revenant
and then use the Frost Gem on it.
- Return to the west side of the Wyrmrest Temple. Get sent
to the top floor of the temple and turn in Seeds of the Lashers.
Get the follow-up That Which Creates Can Also Destroy.

- Fly to Agmar's Hammer.
- Ride east to Vargastrasz. Turn in Report to the Ruby
Dragonshrine and get the follow-up Heated Battle.
- Head southeast down to the Horde forces. The NPCs will quickly
bring down all the undead - all you need to do is tag them
with a little bit of damage to get credit for the kill. Help
kill 12 Frigid Ghoul Attacker, 8 Frigid Geist Attacker,
and 1 Frigid Abomination Attacker.
- Then, return to Vargastrasz and turn in Heated
Battle. Get the follow-up Return to the Earth.
- Ride around south and enter the center area. Pick up the Ruby
Acorns on the ground. Target the fallen red dragons and use
the acorns on them to Free 6 Dragons. Also, look for the
mounted death knight Duke Vallenhal. Weaken him and use
the Unholy Gem.
- Then, return to Vargastrasz and turn in Return to
the Earth. Get the follow-up Through Fields of Flame.
- Head down again to the center tree in the middle. Enter from
the southeast side and kill 6 Frigid Necromancers and
Daliah Suntouch. Loot the Ruby Brooch which starts
the quest The Fate of the Ruby Dragonshrine. Also, inside
the cave, loot the Ruby Lilac.
- Then, return to Vargastrasz and turn in Through
Fields of Flame. Get the follow-up The Steward of Wyrmrest
Temple.
- Return to Agmar's Hammer. Turn in your quests:
- In Search of the Ruby Lilac and get the follow-up
Return to Soar
- Return to Soar and get the follow-up Where the
Wild Things Roam
- In Service of Frost
- In Service of Unholy
- In Service of Blood and get the follow-up The
Power to Destroy.
Kill 6 Shadowy Tormentors once you get transferred to
the "shadow world." When done, Arthas will come and
start talking. When done, cancel the the "World of Shadows"
buff by right clicking it.
Turn in The Power to Destroy and get the follow-up The
Translated Tome, then turn in The Translated Tome.
- In the immediate area outside Agmar's Hammer, use your
Pack of Vaccine and throw them at 5 Snowfall Elk and
5 Arctic Grizzly to innoculate them.
- Then, return to Agmar's Hammer and turn in Where
the Wild Things Roam.
You should have hit Level 74 by now - this opens up
access to Dalaran. Make sure you have your Hearthstone
is set to Venomspite. Get the quest The Magical
Kingdom of Dalaran then talk to the Image of Archmage
Aethas Sunreaver to get teleported to Dalaran.
- At Dalaran, turn in The Magical Kingdom of Dalaran
to Archmage Celindra near the location where you warp
in. Get the quest Learning to Leave and Return: the Magical
Way.
- Use the Teleport to Violet Strand Crystal behind her,
then use the Teleport to Dalaran Crystal to go back.
Turn in Learning to Leave and Return: the Magical Way.
- Take one of the portals to a capital city and train your
skills.
- Then, Hearth to Venomspite.
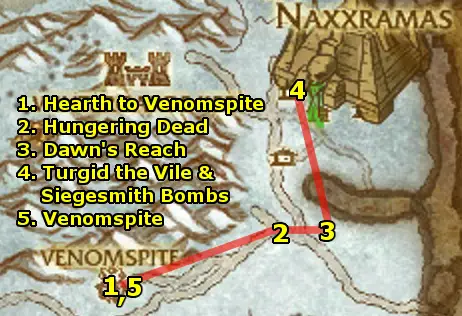
- After Hearthing to Venomspite, turn in Emerald Dragon
Tears and get the follow-up Spread the Good Word. Go
to the eastern gate and mount a Forsaken Blight Spreader.
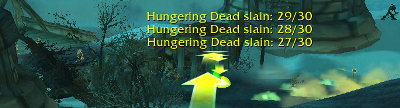
- Drive northeast. Aim your projectile and fire at the Hungering
Dead until you kill 30.
Tip: look for the "Gate" - the undead all bottleneck
here and stream out. Fire at the gate and you'll get your kills
quickly.
- Leave your vehicle and ride east to Dawn's Reach. Get
The Call Of The Crusade.
- Ride north to Turgid the Vile, in the ruined keep. Use
the Seeds of Nature Wrath on him, then kill him.
Also, collect 6 Siegesmith Bombs inside the building.
- Return to Venomspite.
- At Venomspite, turn in your quests:
- Spreading the Good Word and get the follow-up The
Forsaken Blight
- Stealing from the Siegesmiths and get the follow-up
Bombard the Ballistae
Also, get the new quests:
- A Means to an End
- No Mercy for the Captured
- Need to Know
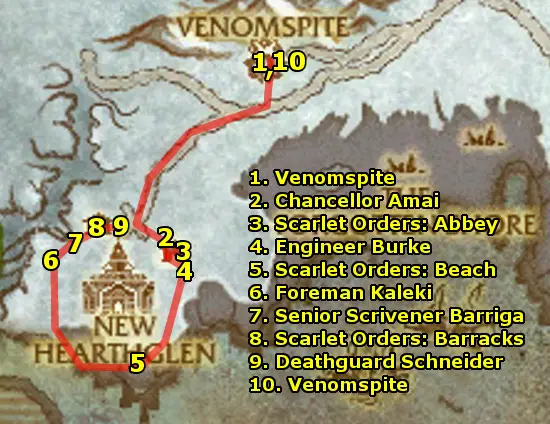
- Ride southwest to New Hearthglen. There are a lot of
targets here! As you're clearing your way from target to target,
use your Siegesmith Bombs to destroy 5 Ballistae.
First, go to Chancellor Amai, who is outdoors in a cage.
Talk to her and then kill her.
- Head southeast and enter the Abbey. In the northeastern
Library Wing, loot the Scarlet Onslaught Daily Orders:
Abbey.
- Head southeast to Engineer Burke. Talk to him, then kill
him.
- Head down the path to the beach. Get the Scarlet Orders:
Beach.
- Head northwest up the path to the Lumbermill. Use your
Levine Family Termites and target the center of the lumbermill
to summon Foreman Kaleki. Kill him.
- Head northeast to Senior Scrivener Barriga. Talk to him,
then kill him.
- Head northeast into the Barracks. Inside a bit, at the
room with the stairs, loot the Scarlet Onslaught Daily Orders:
Barracks.
- Head east to Deathguard Schneider. Talk to him, then
kill him.
- Finally, on your way out of the area, kill an Onslaught
Knight (target the rider on the horse and not the horse
itself) for an Onslaught Riding Crop. Use the crop
on the horse to get on it.
- Ride the horse back to Venomspite and Deliver the
Horse. (Note: we're going to Venomspite two more times
immediately, so there's no need to go back and forth delivering
horses - as we exit Venomspite each time, we'll return a horse
each time so all the quests complete neatly.)
- At Venomspite, turn in your quests:
- A Means to an End and get the follow-up Fire Upon
the Waters
- Need to Know and get the follow-up The Spy in
New Hearthglen
- No Mercy for the Captured and get the follow-up Torture
the Torturer
- Bombard the Ballistae
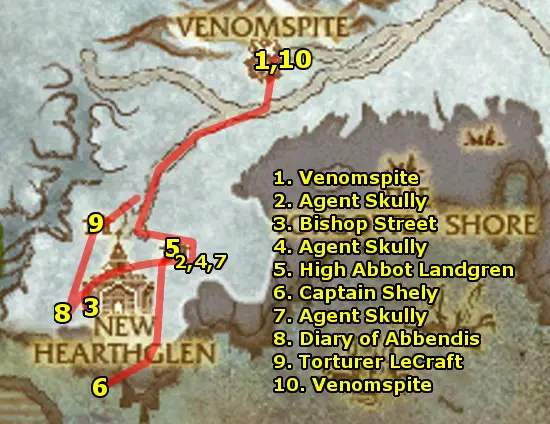
- Ride southwest to Agent Skully in New Hearthglen,
behind the Abbey. Turn in The Spy in New Heartglen and
get the follow-up Without a Prayer.
- Head southwest to Bishop Street in a small chapel and
kill him for Bishop Street's Prayer Book.
- Then, return to Agent Skully. Turn in Without a Prayer
and get the follow-up The Perfect Dissemblance.
- Look nearby for an Onslaught Raven Priest. Use the
Banshee's Magic Mirror on it and then kill it.
- Then, return to Agent Skully. Turn in The Perfect
Dissemblance and get the follow-up Fall From Grace.
- Enter the abbey. Near the entrance, enter the small set of spiraling
staircases all the way to the top and pull the Abbey Bell Rope.
Then, head back down and go to the southeast wing of the abbey.
Talk to High Abbot Landgren. Then, follow him outside and
he will jump off a cliff.
- Head down the ramp and southwest to the Onslaught Ship.
Use your Apothecary's Burning Water and target the ship's
sails. This will allow you to run past all of the Onslaught
Deckhands.
Head downstairs and enter the room behind the stairwell. Kill
Captain Shely for Captain Shely's Rutters.
Run back out quickly and the deckhands will still be busy with
the ship's sails and will ignore you.
- Return to Agent Skully. Turn in A Fall From Grace
and get the follow-up The Truth Will Out.
- Head southwest into a house. Go upstairs and loot the Diary
of High General Abbendis.
- Head northeast into the Barracks. Go to the room with
the stairs and head down into the basement. Target Torturer
LeCraft and use the High Executor's Branding Iron on
him 5 Times. Then, kill him. Loot the Torturer's Rod
from him - it starts the quest The Rod of Compulsion.
- On your way out of the area, kill an Onslaught Knight
for an Onslaught Riding Crop. Use the crop on the
horse to get on it.
- Ride the horse back to Venomspite and Deliver the
Horse.
- At Venomspite, turn in your quests:
- Fire Upon the Waters
- The Rod of Compulsion and get the follow-up The
Denouncement
- The Truth Will Out and get the follow-up Do Unto
Others (Group)
- Torture the Torturer
Do Unto Others is a group quest to kill High General
Abbendis in the big cathedral in New Hearthglen.
If you can get at least a tank and a healer for it, then go
do the quest during the next steps as you go to New Hearthglen
for the final time.
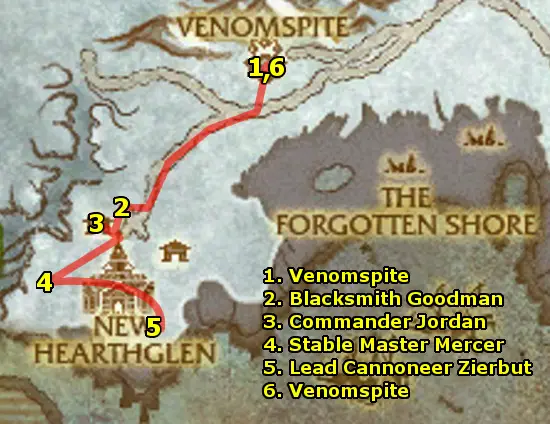
- Ride southwest to Blacksmith Goodman. Use the Rod
of Compulsion on him, then kill him.
- Head into the barracks and clear your way to the top of it.
Use the Rod of Compulsion on Commander Jordan, then
kill him.
- Head southwest to Stable Master Mercer. Use the Rod
of Compulsion on him, then kill him.
- Head east to Lead Cannoneer Zierhut. Use the Rod of
Compulsion on him, then kill him.
- On your way out of the area, kill an Onslaught Knight
for an Onslaught Riding Crop. Use the crop on the
horse to get on it.
- Ride the horse back to Venomspite and Deliver the
Horse. Turn in your quests:
- Fresh Remounts
- The Denouncement
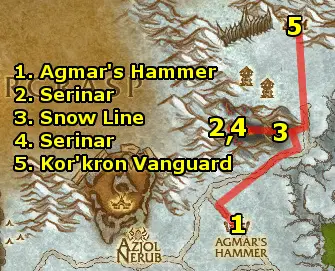
- Fly to Agmar's Hammer. In the village, turn in The
Forsaken Blight. Get The Kor'kron Vanguard!
- Ride northeast to the Obsidian Dragonshrine. Head inside
and talk to Serinar and turn in The Obsidian Dragonshrine.
Get the follow-ups:
- No One to Save You
- No Place to Run
- Head east out of the cave. At the snow line, use the Destructive
Wards. Defend the ward.
Also, kill 6 Burning Depths Necrolyte and 10 Smoldering Skeleton.
- Return to Serinar inside the cave and turn in:
- No One to Save You
- No Place to Run and get the follow-up The Best
of Intentions
With the disguise on, run to the end of the cave to Rothin
the Decaying. Then, return to Serinar and turn in
The Best of Intentions. Get the follow-ups:
- Culling the Damned
- Defiling the Defilers
Clear your way towards the end of the cave. Click on 8 Necromatic
Runes to destroy them. Kill 3 Burning Blade Necromancer,
6 Smoldering Construct, and 6 Smoldering Geist.
Then, return to Serinar and turn in
- Culling the Damned
- Defiling the Defilers and get the follow-up Neltharion's
Flame.
Return to the end of the cave next to Rothin the Decayed
and use Neltharion's Flame, then kill Rothin the
Decayed.
Return to Serinar and turn in Neltharion's Flame and
get the follow-up Tales of Destruction.
- Ride northeast to Kor'kron Vanguard. Go to Sarufang
the Younger and turn in The Kor'kron Vanguard! Get
the follow-up Audience With The Dragon Queen.
At the east side of the town, Get the Flight Path.

- Fly to Wyrmrest Temple. Go to the west side to Tariolastrasz
and turn in The Steward of Wyrmrest Temple. Get the
follow-up Informing the Queen.
Take the flight up to the top and turn in your quests:
- Tales of Destruction
- The Fate of the Ruby Dragonshrine
- Informing the Queen and get the follow-up Report
to Lord Afrasastrasz
- Audience With the Dragon Queen and get the follow-up
Galakrond and the Scourge
Head back to Torastrasza and turn in Galakrond and
the Scourge. Get the follow-up Ruby Wings.
You will get a Ruby Beacon of the Dragon Queen - this
is a very useful item which summons a dragon which you can use
in the Dragon Wastes which is the entire center area
of the map. Don't turn this quest in until you're done with
the zone. Whenever you're travelling in the area, use it to
travel much faster. You can use it for the rest of the guide
as a flying mount!
Talk to Torastrasza and ask him to send you to the middle
floor to Lord Afrasatrasz. Turn in Report to Lord Afrasastrasz
and get the follow-up Defending Wyrmrest Temple.
Head west to the balcony and mount a Wyrmrest Defender.
- Head southwest towards the big purple beam of light. Kill 3
Azure Dragon and 5 Azure Drake along the way with your dragon's
damage abilities (Ability 1 & 2). Use your Renew
whenever you get damaged (Ability 3) and use Ability
4 to run away if you aggro too many. When you reach the beam of
light, use Ability 5 to destabilize it.
- Then, return to Lord Afrasastrasz and turn in Defending
Wyrmrest Temple.
- Use your Ruby Beacon of the Dragon Queen to summon your
dragon and fly north to Galakrond's Rest. Fly to the bottom
of the dug out area and kill 30 Waste Scavengers with your
Engulfing Fireball (Ability 1 and 2). Use Devour
Ghoul (Ability 3) to regain hp and mana near a ghoul.
- Fly northwest to Thiassi. Kill it with your dragon's
attacks, then dismount and kill Grand Necrolord Antiok.
Loot the Scythe of Antiok which drops to the floor.
- Fly southwest to Dragon's Fall.
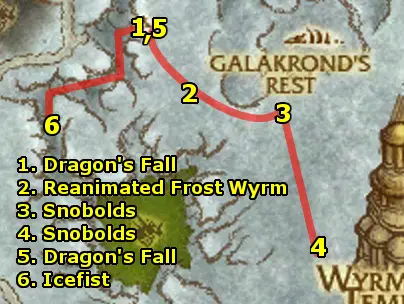
- At Dragon's Fall, get Pest Control.
- Ride southeast. Look to the skies for flying Reanimated
Frost Wyrms - Get in range, target it, and use your Seeds
of Nature Wrath to bring it down, then kill it.
- Head southeast and kill all Snobolds in the area.
- Head southeast to another Snobold camp. Finish killing 10
Snowplain Snobolds and 3 Dragonblight Magnataur.
- Return to Dragon's Fall. Turn in Pest Control and
get the follow-up Canyon Chase.
- Chase the snobolds to Icefist. Kill him and loot the
Emblazoned Battle Horn, which starts the quest Disturbing
Implications.
- Then, return to Dragon's Fall.
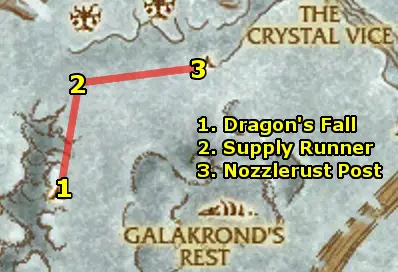
- At Dragon's Fall, turn in Canyon Chase.
- Ride northeast to the Nozzlerust Supply Runner. Get his
quest Return to Sender.
- Fly east to to Nozzlerust Post.

- At Nozzlerust Post, turn in Return to Sender.
Get the quests at the post:
- Nozzlerust Defense
- Shaved Ice
- Stocking Up
- Fly southeast to a digsite. Loot all the Composite Ore in
the carts and kill all the Waste Diggers in the area.
- Fly southeast to the next digsite. Loot all the Composite
Ore in the carts and kill all the Waste Diggers in
the area.
- Fly west to the main digsite. Finish collect 8 Composite
Ore and killing 12 Wastes Digger and 1 Wastes Taskmaster.
- Fly north to the mountainous area and kill Crystalline Ice
Elementals for 4 Iceshard Cluster.
- Ride southeast back to Nozzlerust Post.
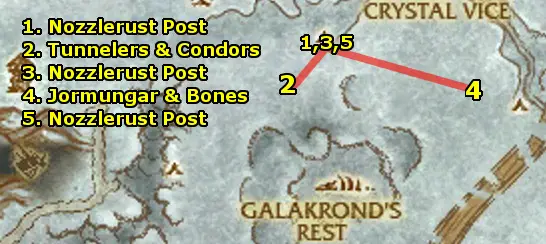
- At Nozzlerust Post, turn in:
- Nozzlerust Defense
- Shaved Ice and get the follow-up Soft Packaging
- Stocking Up
- Head southwest and kill Jormugar Tunnelers and Dragonbone
Condors for 12 Thin Animal Hide.
- Return to Nozzlerust Post and turn in Soft Packaging
and get the new quests:
- Something That Doesn't Melt
- Hard to Swallow
- Ride southeast and weaken a Hulking Jormungar. When it
opens its mouth once you bring it down to 80% HP, use the Potent
Explosives Charges. Pick up the 6 Seared Jormungar Meat
from the resulting explosion.
Pick up 12 Splintered Bone Chunks along the way near the
bones.
- Return to Nozzlerust Post.
- At Nozzlerust Post, turn in:
- Something That Doesn't Melt
- Hard to Swallow
get the new quests:
- Harp on This!
- Lumber Hack
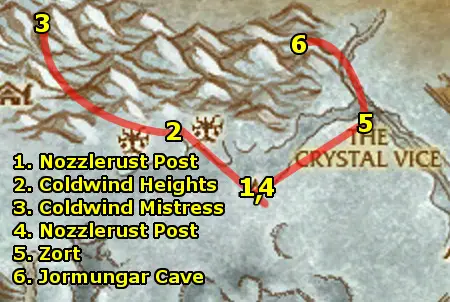
- Ride south a bit so you can mount on your dragon, then fly northwest
to Coldwind Heights.
Use Xink's Shredder Control Device to take control of a
shredder.
- Head northwest. Along the way, use Gather Lumber (Ability
6) next to trees marked with a cross to collect lumber. If
it doesn't work, it means it has been recently gathered by someone
else.
Enter the harpy area. Kill Harpies by constantly using
Twisting Blade (Ability 1) and throwing in Launch
Saw Blades (Ability 2) on cooldown. Use Emergency
Repair Kit (Ability 4) to regain life. Finally, in
the northwest area, kill Mistress of the Coldwind.
Finish gathering 50 Coldwind Lumber.
- Return to Nozzlerust Post and turn in your quests:
- Harp on This!
- Lumber Hack
and get the new quest, Stiff Negotiations.
-
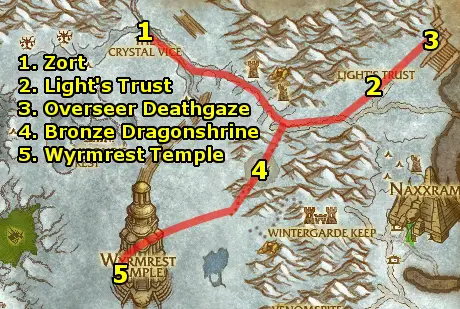
Fly northeast to Zort, inside the canyon. Turn in Stiff
Negotiations and get the follow-up Slim Pickings.
- Follow the path northwest into the cave. At the entrance, click
the Ravaged Crystalline Ice Giant to get a Sample of
Rock Flesh.
- Return to Zort and turn in Slim Pickings and
get the follow-up Messy Business. Also, get the new
quest, Stomping Grounds from Ko'char the Unbreakable.
- Return northwest deeper into the cave. Kill 8 Ice Heart
Jormungar Feeders. Whenever you get the Corosive Spit
debuff, use Zort's Scraper and collect 2 scraping
samples.
- Return to Zort and turn in your quests:
- Messy Business and get the follow-up Apply
This Twice A Day
- Stomping Grounds
- Apply This Twice A Day
Get the new quests:
- Really Big Worm (Group)
- Worm Wrangler
- Head northwest and enter the cave again. Use the Sturdy
Crates on 3 Jormungar Spawns and collect them.
Also, if you have a partner with you, at the end of the
cave, drink Zort's Protective Elixir. Kill Rattlebore.
If not, just ignore the Really Big Worm quest.
- Finally, return to Zort.
- At Zort, turn in Worm Wrangler.
- Ride outside the canyon, then fly your way to Light's Trust.
Turn in The Call of the Crusade and get the follow-up The
Cleansing of Jintha'kalar.
- Ride northeast to Jintha'kalar. Clear your way northeast
and kill 15 Jintha'kalar Scourge. Use your Seeds of
Nature Wrath on Overseer Deathgaze on the eastern area
of the camp then kill him.
- Then, return to Light's Trust and turn in The
Cleansing Of Jintha'kalar and get the follow-up Into
the Breach!
- Ride southwest into the Bronze Dragonshrine. In the area,
use your Hourglass of Eternity to summon Future You.
Let Future You tank the attacking waves of dragons, you can pick
them off one by one.
- Ride southwest, then fly the rest of the way to Wyrmrest
Temple. On the bottom floor, turn in Disturbing Implications
and get the follow-up One of a Kind (Group).
Look for a partner to do the quest chain for One of a Kind.
Any two will be good, but the last steps are recommended to have
a tank and healer in your group. The below map shows the locations
of all the minotaur for the quest - get to it whenever you find
someone to do the minotaur chain with you. If you don't readily
have someone to do it with you, then just skip over these group
quests.
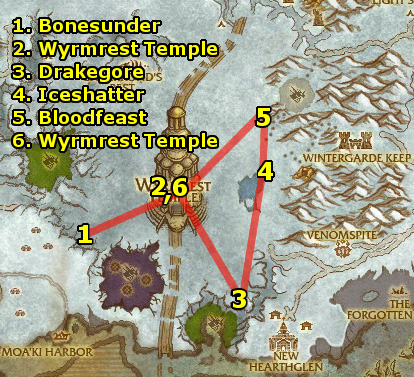
- (Group) Use your Ruby Beacon of the Dragon Queen to
summon a dragon. Use it to fly southwest to Bonesunder.
Kill him for his Emblazoned Battle Horn.
- (Group) Fly back to Wyrmrest Temple and turn in
One of a Kind and get the follow-up Mighty Magnataur.
- (Group) Fly southeast to Bloodfeast. Have one
person attack Bloodfeast and one person kill all the maggots.
- (Group) Fly north to Iceshatter. Kill him.
- (Group) Fly north to Drakegore. Kill him.
- (Group) Return to Wyrmrest Temple and turn in
Mighty Magnataur and get the follow-up Reclusive Runemaster.
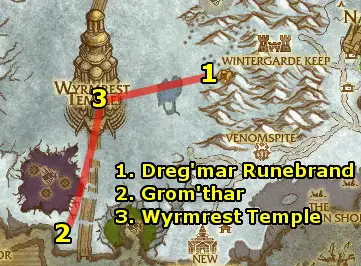
- (Group) Fly east to Dreg'mar Runebrand and defeat
him.
- Return to Wyrmrest Temple. Turn in Reclusive Runemaster
and get the follow-up Wanton Warlord.
- (Group) Fly southwest to Grom'thar and kill him.
- (Group) Head back northeast to where you can summon a
dragon, then fly to Wyrmrest Temple and turn in Wanton
Warlord
Whether or not you did the group quests, to finish up Dragonblight
- fly to the top of Wyrmrest Temple and turn in your
quests:
- On Ruby Wings and get the follow-up Return to Angrathar
- That Which Creates Can Also Destroy
- Mystery of the Infinite
Then, fly back to the ground floor.
- Fly to Kor'kron Vanguard. Go to Saurfang the Younger
and turn in Return to Angrathar and be treated to the
cinematic.
- Head down to the remnants of the battle and get Darkness
Stirs from Alexstrasza. Loot the Armor of Saurfang,
just northwest of where Alexstrasza is standing.
- Ride back to Fordragon Hold and Fly to Warsong Hold,
Borean Tundra. Turn in Darkness Stirs and get the follow-up
Herald of War.
- Take the portal to Orgrimmar. Go to Thrall and
turn in Herald of War. Get the follow-up A Life Without
Regret.
- Take the portal to The Undercity.
- Turn in A Life Without Regret and get the follow-up
The Battle For the Undercity. Wait for a couple minutes,
then follow Thrall into the Undercity. The most important
thing is to continually follow Thrall - stay in range
of their auras and you will be invincible and deal massive damage.
Use your Area of Effect abilities for the most effect!
- Once done re-taking the Undercity, turn in The Battle For
The Undercity. You will get teleported to the zeppelin tower.
- Return to Orgrimmar. Train your skills.
- Hearth back to Venomspite, Dragonblight.
|
|
